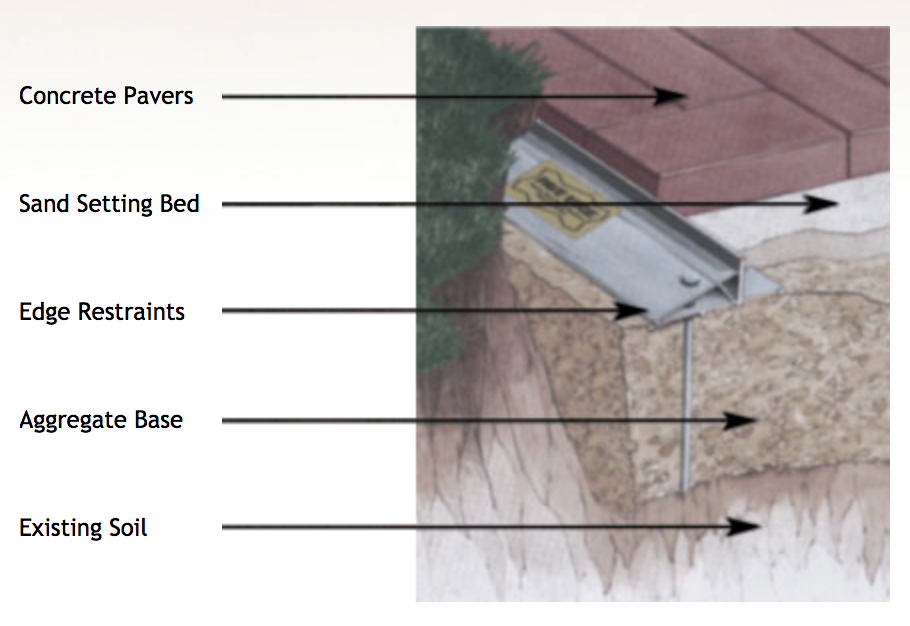
Paver Installation Process: A Comprehensive Guide
Transforming your outdoor space with pavers is a rewarding endeavor that requires meticulous planning and execution. This comprehensive guide will delve into every aspect of the paver installation process, providing detailed instructions and expert insights to ensure a successful outcome.
Step 1: Site Preparation
1.1. Excavation and Grading:
Excavate the installation area to the desired depth, ensuring a level and stable base. Grade the soil to create a slight slope for drainage.
1.2. Compaction:
Compact the excavated soil using a plate compactor to create a solid foundation. This prevents settling and ensures the pavers remain level.
1.3. Base Layer Installation:
Install a base layer of crushed stone or gravel over the compacted soil. Spread and compact the base material to provide a stable and porous surface for the pavers.
Step 2: Paver Selection and Layout
2.1. Paver Selection:
Choose pavers that complement your landscape design and meet your functional requirements. Consider factors such as durability, color, texture, and shape.
2.2. Paver Layout:
Plan the paver layout to create a visually appealing and functional design. Consider straight lines, curves, patterns, and borders to enhance the aesthetic appeal.
2.3. Dry Layout:
Arrange the pavers in their intended pattern without setting them in place. This allows you to visualize the final design and make adjustments as needed.
Step 3: Paver Installation
3.1. Mortar Setting Bed:
Spread a thin layer of mortar over the base layer and screed it to create a level surface. This provides a strong bond between the pavers and the base.
3.2. Paver Placement:
Carefully place the pavers into the mortar bed, ensuring they are level and aligned with the desired pattern. Use a rubber mallet to tap the pavers into place.
3.3. Joint Spacing:
Maintain consistent joint spacing between the pavers to allow for proper drainage and prevent cracking. Use spacers or a jointing tool to achieve uniform spacing.
Step 4: Joint Filling
4.1. Joint Sand Selection:
Choose a joint sand that is compatible with the pavers and the intended use of the area. Polymeric sand is recommended for high-traffic areas.
4.2. Joint Sand Application:
Spread the joint sand over the pavers and sweep it into the joints using a broom or brush. Compact the sand to ensure it fills the joints completely.
4.3. Joint Sealing:
Apply a joint sealer to the filled joints to prevent weeds, insects, and moisture penetration. This enhances the durability and longevity of the paver installation.
Step 5: Finishing Touches
5.1. Edge Restraints:
Install edge restraints around the perimeter of the paver installation to prevent shifting and maintain the integrity of the design.
5.2. Cleaning:
Clean the pavers and joints thoroughly using a pressure washer or a stiff brush. Remove any excess mortar or joint sand to enhance the appearance and prevent staining.
5.3. Sealing:
Apply a paver sealer to the entire surface to protect against stains, fading, and wear. This enhances the longevity and beauty of the paver installation.
Additional Considerations
6.1. Slope and Drainage:
Ensure proper drainage by sloping the paver surface away from buildings and structures. Install drainage channels or weep holes to prevent water accumulation.
6.2. Maintenance:
Regularly clean and seal the pavers to maintain their appearance and prevent damage. Remove weeds and debris from the joints to ensure proper drainage.
6.3. Repairs:
In the event of cracked or damaged pavers, replace them promptly to prevent further deterioration. Use the same type of pavers and follow the same installation process to ensure a seamless repair.
Troubleshooting Common Issues
7.1. Settling:
Address settling by compacting the base layer more thoroughly or adding additional base material. Ensure proper drainage to prevent water accumulation.
7.2. Cracking:
Cracking can occur due to excessive weight, poor drainage, or improper installation. Replace cracked pavers and ensure the base layer is stable and well-compacted.
7.3. Joint Failure:
Joint failure can result from improper joint spacing, inadequate joint sand, or lack of joint sealing. Clean and refill the joints with compatible joint sand and apply a joint sealer to prevent future failures.
Conclusion
Installing pavers is a rewarding project that can transform your outdoor space into a beautiful and functional area. By following the detailed steps outlined in this comprehensive guide, you can ensure a successful installation that will provide years of enjoyment and enhance the value of your property. Remember to consider the specific needs of your project and consult with a professional if necessary. With meticulous planning and execution, you can create a stunning paver installation that will be the envy of your neighborhood.