Paver Installation Guidelines: A Comprehensive Guide
Introduction
Pavers, also known as interlocking concrete pavers (ICPs), are a versatile and durable paving option for a wide range of applications, from driveways and patios to pool decks and commercial walkways. Proper installation is crucial to ensure the longevity and aesthetic appeal of your paver surface. These guidelines provide detailed instructions on every step of the paver installation process, from site preparation to joint stabilization.
Site Preparation
1. Excavation and Grading
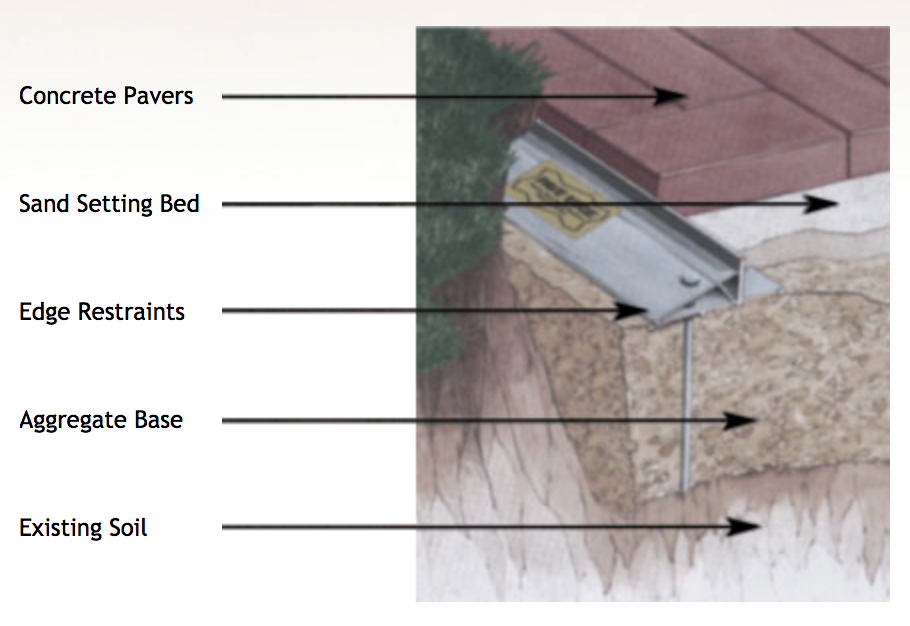
- Determine the desired elevation of the paver surface and excavate the area to a depth of 8-12 inches below this elevation.
- Compact the subgrade using a plate compactor or other suitable equipment.
- Establish a positive drainage slope of 1/4 inch per foot away from structures and toward drainage outlets.
2. Base Material
- Install a 4-6 inch layer of compacted aggregate base material, such as crushed stone or gravel.
- Compact the base material to a minimum of 95% Modified Proctor density.
- Use a screed or level to ensure a smooth and even surface.
3. Bedding Sand
- Spread a 1-2 inch layer of bedding sand over the base material.
- Use a plate compactor to lightly compact the sand, creating a stable and level base for the pavers.
Paver Installation
1. Pattern and Layout
- Determine the desired paver pattern and layout.
- Start laying pavers from a straight edge, such as a string line or a curb.
- Use a rubber mallet or paver tamper to gently tap the pavers into place.
2. Leveling and Alignment
- Use a level to check the pavers for levelness and adjust as necessary.
- Use a string line or straight edge to ensure proper alignment.
- Make small adjustments to the pavers by tapping them with a rubber mallet.
3. Cutting and Fitting
- Use a paver cutter or wet saw to cut pavers to fit around obstacles or to create custom shapes.
- Make sure the cuts are clean and accurate.
- Use a grinder or chisel to smooth any rough edges.
Joint Stabilization
1. Joint Sand
- Sweep joint sand into the spaces between the pavers.
- Use a broom or brush to work the sand into the joints.
- Compact the sand using a plate compactor or hand tamper.
2. Joint Sealer
- Apply a joint sealer to the joints between the pavers.
- Use a brush or trowel to apply the sealer evenly.
- Allow the sealer to cure according to the manufacturer’s instructions.
3. Edge Restraint
- Install edge restraints around the perimeter of the paver surface to prevent the pavers from shifting or spreading.
- Use concrete curbs, metal edging, or plastic paver restraints.
Finishing Touches
1. Cleaning
- Sweep or blow away any excess sand or debris from the paver surface.
- Use a mild detergent and water to clean the pavers, if necessary.
2. Sealing
- Apply a sealer to the paver surface to protect it from stains, fading, and wear.
- Use a brush or roller to apply the sealer evenly.
- Allow the sealer to cure according to the manufacturer’s instructions.
3. Maintenance
- Regularly sweep or blow away dirt and debris from the paver surface.
- Apply a sealer every few years to maintain the paver’s appearance and durability.
- Repair any damaged or cracked pavers promptly to prevent further deterioration.
Additional Considerations
1. Climate
- Consider the local climate when selecting pavers and installing them.
- Use pavers with a high freeze-thaw resistance in cold climates.
- Install pavers on a well-drained base to prevent water damage.
2. Traffic
- Choose pavers with an appropriate thickness and strength for the expected traffic load.
- Use a thicker paver and a stronger base for heavy traffic areas.
3. Aesthetics
- Select pavers in colors and textures that complement the surrounding landscape and architectural style.
- Create patterns and designs with different paver shapes and colors.
4. Safety
- Use non-slip pavers for areas where safety is a concern, such as pool decks and walkways.
- Install pavers with a smooth surface to prevent tripping hazards.
5. Sustainability
- Consider using permeable pavers to reduce stormwater runoff and improve drainage.
- Use recycled materials in the base and bedding materials to promote sustainability.
Conclusion
By following these comprehensive paver installation guidelines, you can create a beautiful, durable, and long-lasting paver surface that will enhance the aesthetic appeal and functionality of your property. Remember to consider the specific requirements of your project, including climate, traffic, aesthetics, safety, and sustainability, to ensure the best possible results.