Paver Installation Steps: A Comprehensive Guide
Introduction
Pavers, also known as paving stones, are a popular choice for patios, driveways, and walkways due to their durability, aesthetic appeal, and ease of maintenance. Installing pavers requires careful planning and execution to ensure a long-lasting and attractive surface. This comprehensive guide will provide you with step-by-step instructions on how to install pavers, from preparing the base to grouting and sealing.
Step 1: Planning and Preparation
1.1 Determine Your Project Scope
Before you begin, determine the size and shape of the area you want to pave. Consider the intended use of the space and the aesthetic you desire.
1.2 Gather Materials
Gather all the necessary materials, including pavers, base material (gravel or crushed stone), sand, edging, and tools (level, tamper, plate compactor, string line).
Step 2: Site Preparation
2.1 Excavate the Area
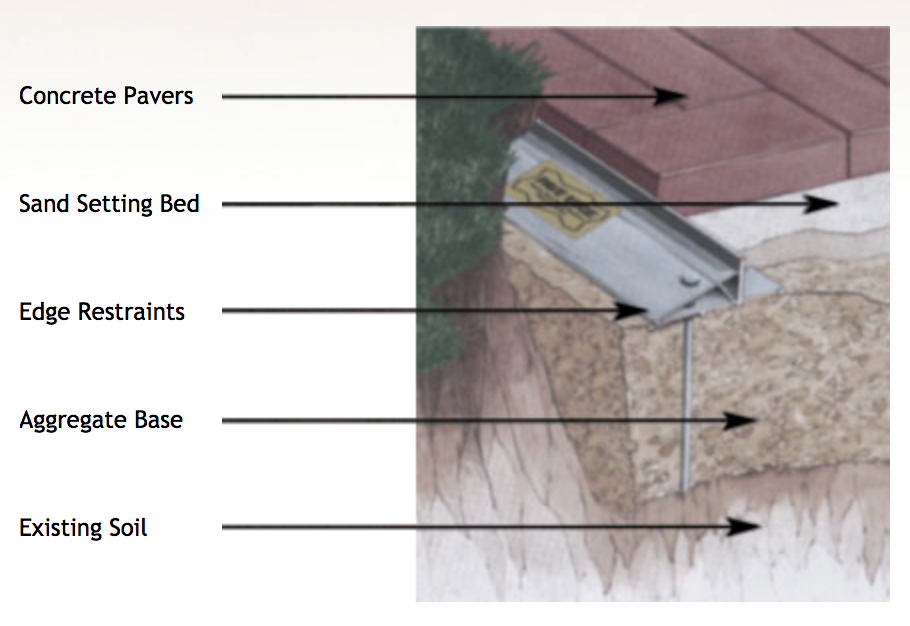
Excavate the area to a depth of 6-8 inches below the desired finished height. Ensure that the excavation is level and slopes away from structures to prevent water accumulation.
2.2 Install Edging
Install edging around the perimeter of the excavated area to retain the pavers and prevent them from shifting. Use stakes and a string line to ensure the edging is level and secure.
Step 3: Base Layer Installation
3.1 Spread Gravel Base
Spread a 4-inch layer of gravel or crushed stone over the excavated area. Tamp the gravel firmly to create a stable base.
3.2 Compact the Gravel
Use a plate compactor to compact the gravel until it is firm and level. Ensure that the surface is smooth and free of any bumps or depressions.
Step 4: Sand Layer Installation
4.1 Spread Sand
Spread a 1-inch layer of fine sand over the compacted gravel base. Use a rake to level the sand and remove any excess.
4.2 Screed the Sand
Use a screed or a straight edge to level the sand and create a smooth, even surface. Ensure that the sand is level in all directions.
Step 5: Paver Installation
5.1 Lay the Pavers
Begin laying the pavers in a straight line, working from one corner of the area. Use a level to ensure that each paver is level and flush with the adjacent pavers.
5.2 Cut Pavers (if necessary)
If necessary, cut pavers to fit around obstacles or to create curves. Use a paver saw or a wet saw to make precise cuts.
5.3 Adjust the Pavers
Use a rubber mallet or a tamper to adjust the pavers and ensure they are level and firmly seated in the sand.
Step 6: Compacting the Pavers
6.1 Compact the Pavers
Use a plate compactor to compact the pavers. Compact the pavers in multiple passes, starting from the edges and working towards the center.
6.2 Check the Level
Use a level to check the level of the pavers after compaction. Adjust any pavers that are out of level by adding or removing sand beneath them.
Step 7: Joint Sand Installation
7.1 Sweep Joint Sand
Sweep fine sand into the joints between the pavers. Use a broom or a paver brush to work the sand into the joints.
7.2 Compact the Joint Sand
Compact the joint sand using a plate compactor or a vibrating plate. This will help to lock the pavers in place and prevent weeds from growing between them.
Step 8: Grouting (Optional)
8.1 Mix Grout
Mix grout according to the manufacturer’s instructions. Grout is a mixture of cement, sand, and water that is used to fill the joints between the pavers and create a solid surface.
8.2 Apply Grout
Apply grout to the joints using a grout float or a trowel. Work the grout into the joints, ensuring that all the joints are filled.
8.3 Clean Excess Grout
Once the grout has set, use a sponge or a damp cloth to clean off any excess grout from the surface of the pavers.
Step 9: Sealing (Optional)
9.1 Apply Sealer
Apply a paver sealer to the surface of the pavers. Paver sealer helps to protect the pavers from stains, moisture, and fading.
9.2 Allow the Sealer to Dry
Allow the sealer to dry completely according to the manufacturer’s instructions. This will help to protect the pavers and extend their lifespan.
Conclusion
Installing pavers is a rewarding project that can enhance the beauty and functionality of your outdoor space. By following these step-by-step instructions carefully, you can create a durable and attractive paver surface that will last for years to come. Remember to plan carefully, prepare the site properly, and use quality materials to ensure a successful installation.