Paver Installation: A Comprehensive Guide
Introduction
Pavers, also known as interlocking concrete pavers (ICPs), are a popular choice for outdoor surfaces due to their durability, versatility, and aesthetic appeal. Installing pavers is a complex process that requires careful planning, preparation, and execution. This comprehensive guide will provide a step-by-step overview of the paver installation process, covering everything from site preparation to sealing.
Site Preparation
1. Site Assessment and Layout
- Determine the scope of the project, including the size and shape of the area to be paved.
- Check for any existing utilities or obstacles that may need to be relocated.
- Establish the desired grade and slope for drainage.
2. Excavation and Compaction
- Excavate the area to the desired depth, typically 6-8 inches below the finished grade.
- Compact the subgrade using a plate compactor or hand tamper to ensure a stable base.
3. Base Installation
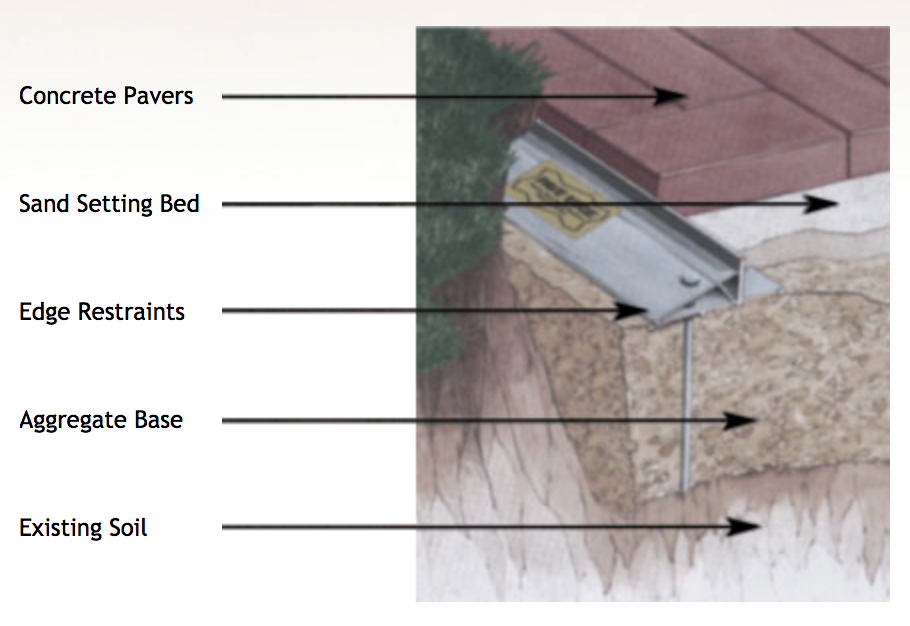
- Install a base layer of crushed stone or gravel, approximately 4 inches thick.
- Compact the base layer thoroughly to provide a solid foundation for the pavers.
4. Edging
- Install edging around the perimeter of the area to retain the pavers and prevent them from shifting.
- Choose edging materials that complement the pavers and the surrounding landscape.
Paver Installation
1. Setting the Pavers
- Start laying the pavers from the center of the area and work outwards.
- Use a rubber mallet or paver tamper to gently tap the pavers into place, ensuring a level and consistent surface.
- Maintain a consistent joint width between the pavers, typically 1/8-1/4 inch.
2. Cutting and Fitting
- Use a paver cutter or wet saw to cut pavers to fit around obstacles or curves.
- Ensure that the cuts are clean and precise to maintain the integrity of the surface.
3. Compaction and Leveling
- Once the pavers are in place, compact them using a plate compactor or hand tamper.
- Check the surface for levelness and make any necessary adjustments.
Sanding and Sealing
1. Sanding
- Apply a layer of fine sand over the pavers and sweep it into the joints.
- The sand will fill the voids between the pavers and prevent weed growth.
2. Sealing
- Apply a paver sealant to protect the surface from stains, fading, and wear.
- Choose a sealant that is compatible with the paver material and the intended use of the area.
Maintenance and Repair
1. Regular Cleaning
- Sweep or power wash the pavers regularly to remove dirt and debris.
- Avoid using harsh chemicals or abrasive cleaners that can damage the surface.
2. Joint Maintenance
- Inspect the joints regularly and fill any gaps with additional sand.
- This will prevent weeds from growing and maintain the stability of the surface.
3. Repairing Broken Pavers
- Remove the broken paver and any surrounding sand.
- Install a new paver in its place and compact it into position.
- Fill the joints with sand and seal the area.
Conclusion
Installing pavers is a rewarding project that can enhance the beauty and functionality of any outdoor space. By following the steps outlined in this guide, you can achieve a professional-looking paver surface that will last for years to come. With proper maintenance and care, your pavers will continue to provide a durable and attractive addition to your property.