Paver Installation Guidelines: A Comprehensive Guide to Achieving a Durable and Aesthetically Pleasing Surface
Introduction
Pavers are a versatile and durable material that can enhance the aesthetic appeal and functionality of any outdoor space. Whether you’re creating a patio, driveway, or walkway, proper paver installation is essential to ensure a long-lasting and visually stunning surface. This comprehensive guide will provide you with step-by-step instructions and best practices for a successful paver installation project.
Site Preparation
1. Excavation and Grading
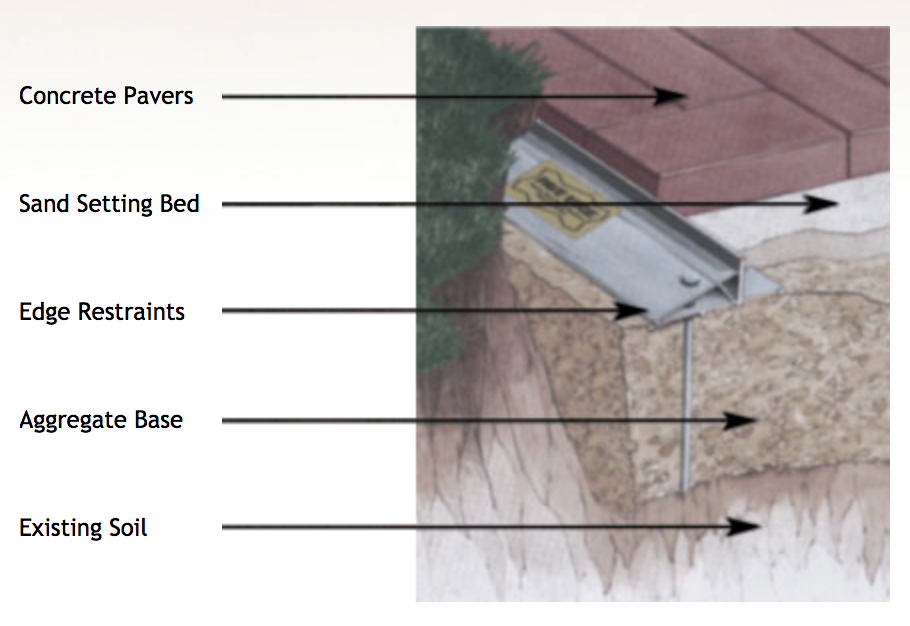
- Excavate the installation area to the desired depth, typically 6-8 inches.
- Grade the area to ensure proper drainage and a level surface.
- Compact the soil using a plate compactor to create a firm base.
2. Base Layer Installation
- Install a 4-inch layer of crushed stone as the base layer.
- Spread and compact the crushed stone evenly to create a stable foundation.
- Use a screed or level to ensure the base layer is flat and level.
3. Edge Restraints
- Install edge restraints around the perimeter of the installation area to prevent pavers from shifting or spreading.
- Use concrete curbing, metal edging, or plastic edging materials.
- Secure the edge restraints firmly into the ground.
Paver Installation
1. Paver Layout
- Plan the paver layout in advance to create a visually appealing design.
- Consider the size, shape, and color of the pavers for optimal aesthetics.
- Use a string line or chalk to mark the desired paver pattern.
2. Paver Placement
- Start laying the pavers from the edge of the installation area.
- Use a rubber mallet to gently tap the pavers into place, ensuring they are level and secure.
- Maintain a consistent spacing between the pavers, typically 1/8-1/4 inch.
3. Cutting Pavers
- Use a wet saw or paver cutter to cut pavers to fit around obstacles or create custom shapes.
- Measure and mark the pavers accurately before cutting.
- Wear safety glasses and gloves while cutting pavers.
Joint Filling
1. Joint Sand Selection
- Choose a polymeric sand or fine-grained sand for filling the joints between pavers.
- Polymeric sand hardens when wet, creating a durable and weed-resistant surface.
2. Joint Sand Application
- Spread the joint sand evenly over the pavers, ensuring it fills all the joints.
- Use a broom or brush to work the sand into the joints.
- Compact the sand using a plate compactor or vibrating plate.
3. Joint Sealing (Optional)
- Apply a joint sealant to the joints between pavers for added durability and weed prevention.
- Choose a sealant that is compatible with the paver material and joint sand.
- Follow the manufacturer’s instructions for application.
Finishing Touches
1. Cleaning
- Remove any excess sand or debris from the surface of the pavers.
- Use a pressure washer or garden hose to gently clean the pavers.
2. Sealing
- Apply a paver sealer to protect the surface from stains, fading, and weathering.
- Choose a sealer that is appropriate for the paver material and desired finish.
- Follow the manufacturer’s instructions for application.
3. Maintenance
- Regularly sweep or blow away debris from the paver surface.
- Remove weeds as they appear.
- Reapply joint sand or sealant as needed to maintain the integrity of the surface.
Troubleshooting
1. Pavers Shifting or Settling
- Check the base layer for proper compaction.
- Ensure the edge restraints are securely installed.
- Fill any voids beneath the pavers with compacted sand or gravel.
2. Joint Sand Erosion
- Use polymeric sand for improved durability and erosion resistance.
- Compact the joint sand thoroughly after application.
- Reapply joint sand as needed to maintain the integrity of the surface.
3. Stains or Discoloration
- Use a paver cleaner specifically designed for the paver material.
- Apply a paver sealer to protect the surface from future stains.
- Remove any spills or stains promptly to prevent permanent damage.
Conclusion
By following these comprehensive paver installation guidelines, you can create a durable, aesthetically pleasing, and low-maintenance surface that will enhance the beauty and functionality of your outdoor space for years to come. Remember to plan carefully, prepare the site properly, install the pavers with precision, and maintain the surface regularly to ensure a long-lasting and visually stunning paver installation.